VIO v4 Member App - User Guide
Welcome to the VIO v4 Member App. This guide describes main screens and routes (App.jsx). Screenshots live under guides/member-app/screenshots/ and are copied to the docs site with scripts/sync-guides-to-docs.sh.
Table of Contents
- Login
- Home
- Send Tokens
- Receive Tokens
- News
- Explore
- Vouchers
- Transaction History
- Account
- Profile
- Member Card
- Notifications
- Security
- Linked Accounts
- Settings
- Help & Support
- Logout
- Terms of Service
- Privacy Policy
- Membership
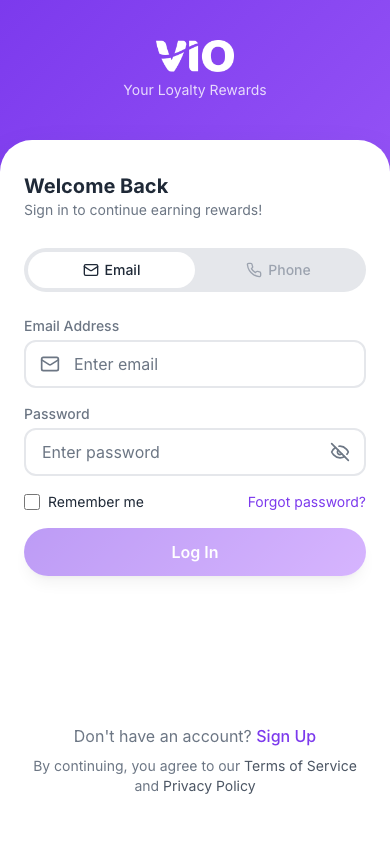
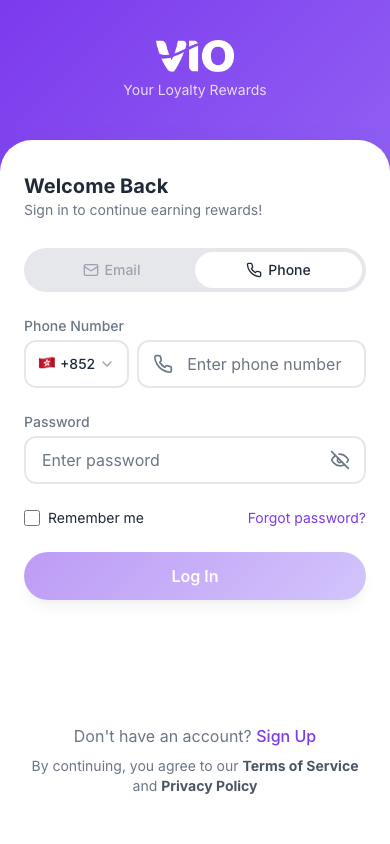
1. Login
Sign in with Email or Phone (country code + mobile). Links: Create account (/register), Forgot password (/forgot-password), and after sign-up Verify OTP (/verify-otp). The guide includes figures for phone login and the forgot-password flow.
Login with email
Login with phone
Select the Phone tab to choose a country code and enter your mobile number (digits only), then enter your password and sign in.
Forgot password
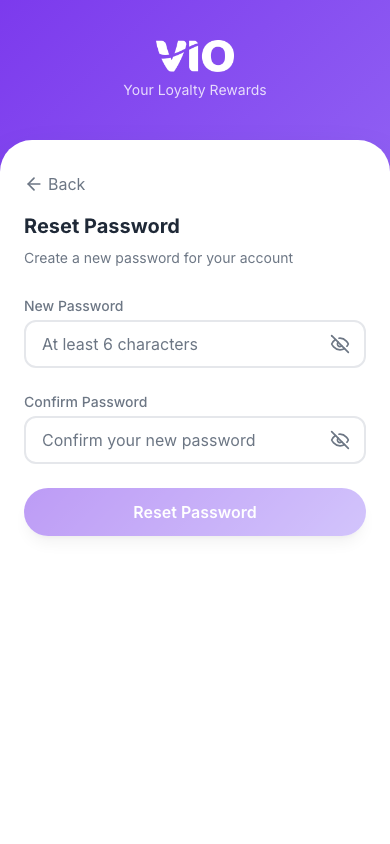
From the login screen, tap Forgot password to open /forgot-password. The flow matches email or phone tabs like sign-in: request a code, enter the 6-digit OTP, set a new password, then return to the login screen.
- Request code — Choose Email or Phone, enter your registered address or number, then tap Send verification code.
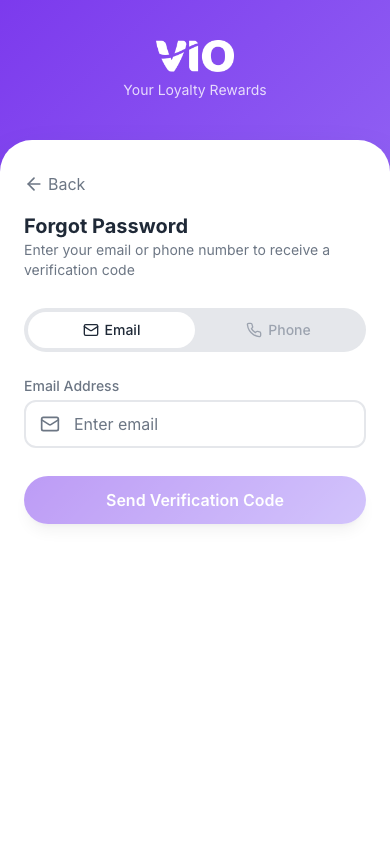
- Phone — Same screen with the Phone tab: pick country code and mobile number, then send the code.
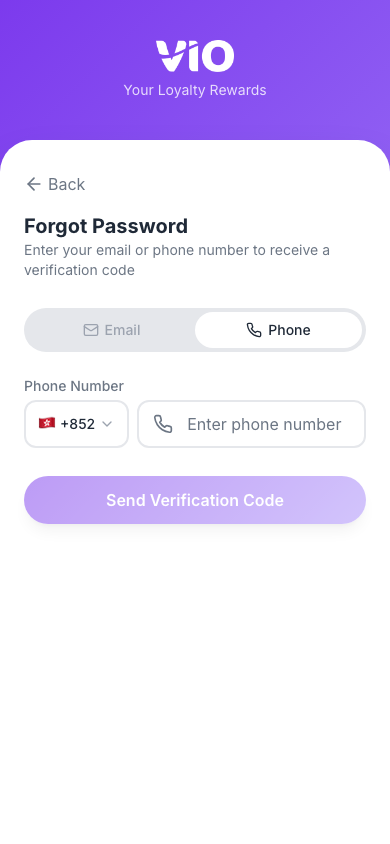
- Enter OTP — Enter or paste the 6-digit code (you can use Resend after the timer). The same Verify OTP pattern is used on
/verify-otpafter registration.

- New password — Enter and confirm your new password, then submit. On success, use Back to Sign In.
2. Home
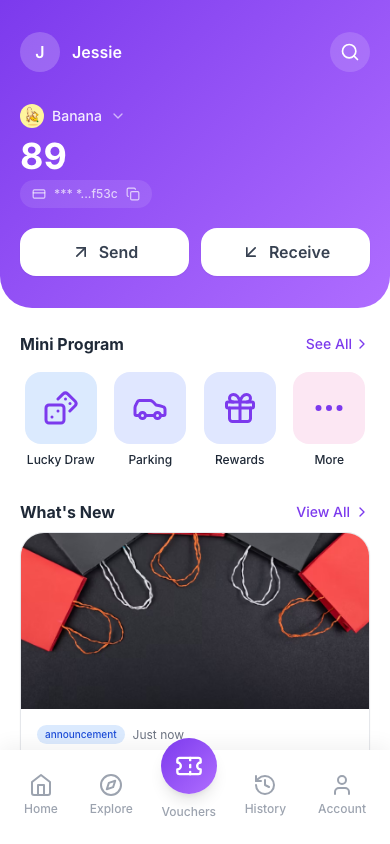
Main dashboard after sign-in at /: wallet address and balance, Send / Receive shortcuts, mini programmes, and scrollable content (vouchers, news, etc.) with bottom navigation.
How to use
- Wallet — Tap the masked address row (copy icon) to copy your full wallet address; a toast confirms.
- Balance — Current balance uses the token symbol dropdown (chevron) to switch tokens when you hold more than one; the receipt icon opens token history (
/token-history). - Actions — Receive and Send open
/receiveand/send(same screens as Send Tokens and Receive Tokens below). Under Mini programme, See all opens/mini-appswhen your tenant enables mini apps. - Navigation — Scroll for vouchers, news, and more; use the bottom bar for Explore, Home, Account, and other tabs.
Figures — Home overview (wallet, balance, actions). Mini programmes — full list via See all (/mini-apps). Full Send / Receive UI is documented in Send Tokens and Receive Tokens.

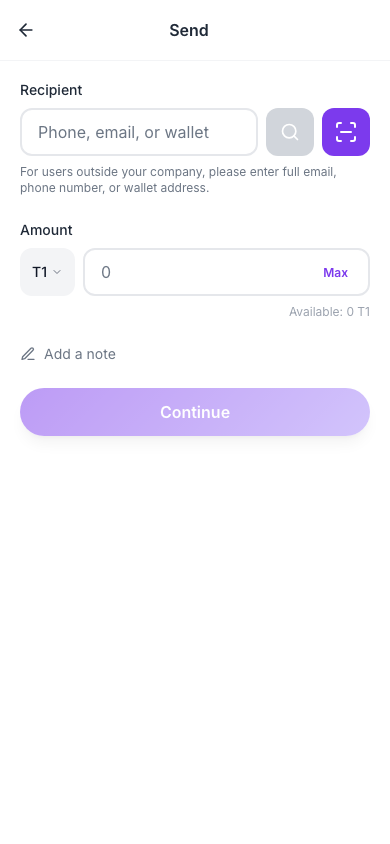
3. Send Tokens
Send tokens at /send: choose recipient (phone or wallet / QR), token, amount, optional memo, then confirm.
How to use
- Recipient — Enter phone number or wallet address, or use scan QR where available.
- Token — Select which token to send from the picker or list.
- Amount — Enter the amount; review fees, limits, or balance hints if shown.
- Memo — Add an optional note for the transfer when the field is available.
- Confirm — Review the summary and submit; wait for success or error feedback.
Figures — Send Tokens compose / confirm screen (/send).
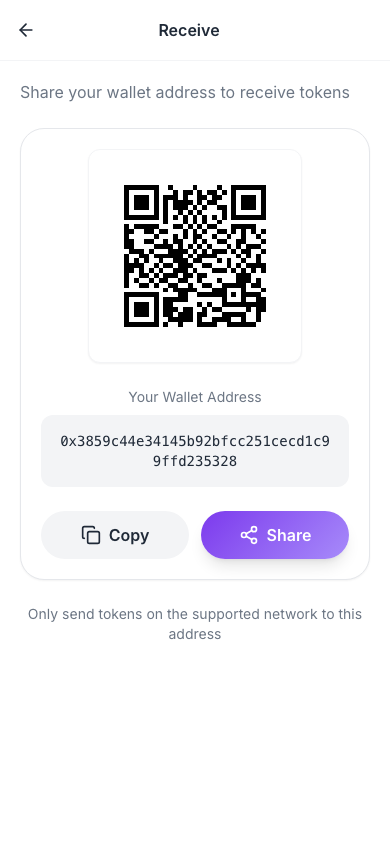
4. Receive Tokens
Receive tokens at /receive: show your QR code and wallet address so others can send to you; pick token context when you hold multiple.
How to use
- QR — Display your receive QR for others to scan.
- Address — Copy or share your wallet address if the screen offers it.
- Token — Choose which token you are receiving when multiple tokens exist.
- Activity — After a transfer, check balance or Transaction History for the incoming entry.
Figures — Receive Tokens screen (/receive).
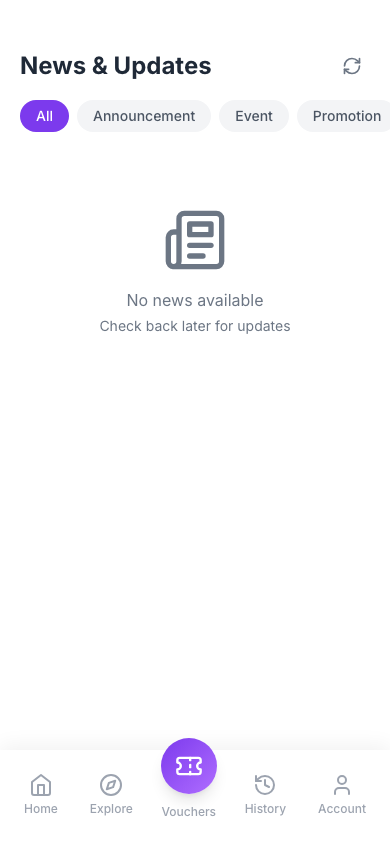
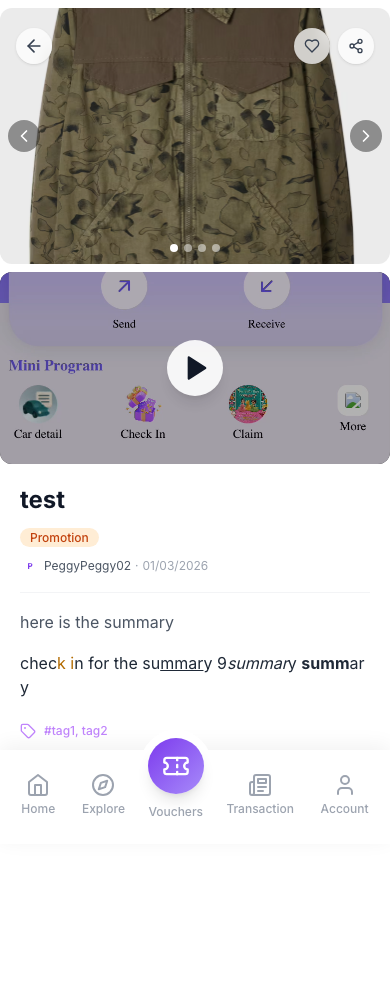
5. News
News feed at /news: search and refresh in the header, category pills, infinite scroll, like on each card, and tap-through to article detail at /news/:id.
How to use
- Search — Tap the magnifying glass (top right) to open the inline search field; type to filter articles (debounced ~400 ms). Tap X on the field to clear text, or tap the X in the circle (replacing the magnifying glass) to close search and return to the normal title bar.
- Refresh — With search closed, tap the circular arrows next to the search control to reload the list from page 1 (same category and current search query). The icon spins while the request runs.
- Categories — Use the horizontal pills (All, Announcement, Event, Promotion, Update, Other) to filter.
- List — Newest first; pinned items show a pin badge. Scroll for infinite loading.
- Like — Tap the heart on a card (does not open the article).
- Open article — Tap the card (title, image, summary) to open full article detail (
/news/:id) — see screenshot below.
Figures — News list (/news). Article — detail after tapping a card (/news/:id).
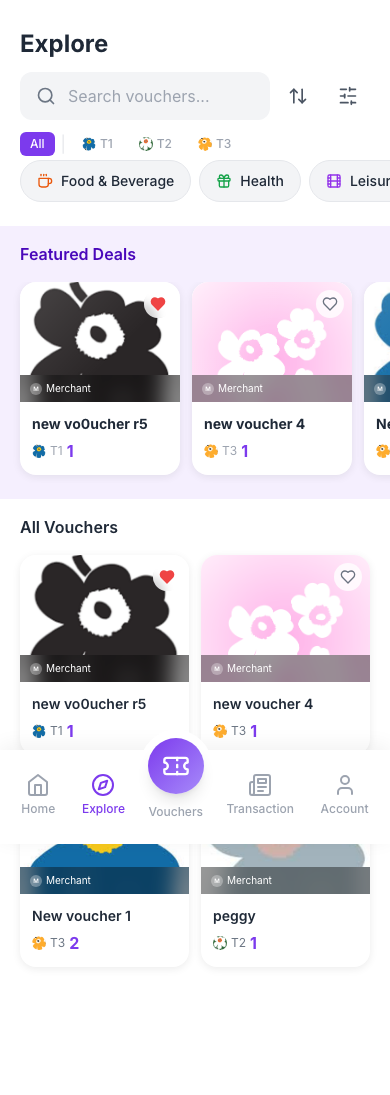
6. Explore
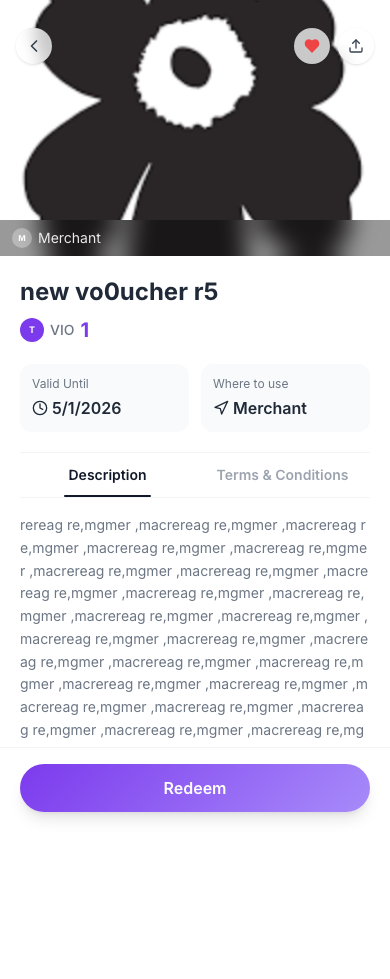
Browse tenant vouchers (/explore): token chips (All or a specific token) limit which vouchers are listed, plus search, sort, filter sheet, category pills, featured strip, and infinite scroll.
How to use
- Token chips — Tap All to list every voucher, or tap a token (icons/symbols from claim-cost tokens and your balances) to show only vouchers priced in that token.
- Search & refine — Use the search field, sort (e.g. newest, expiring, value), and filters (expiry, token price range, merchants, countries). Select a category pill to narrow by category.
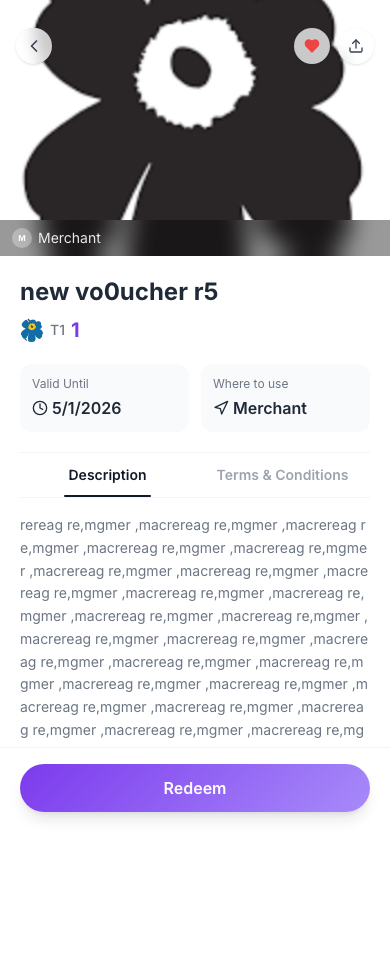
- Open a voucher — Tap a card to open voucher claim / detail at
/vouchers/:id(see screenshot below). Review images, description, and token cost. - Share — On the voucher detail page, tap Share in the top bar (next to the heart). Many phones and browsers open the system share dialog with title, text, and link; if not, the page URL is copied to the clipboard and a toast confirms.
- Redeem — Sign in if prompted. Tap Claim to spend tokens and add the voucher to your wallet; on success you are taken to your claimed voucher at
/voucher/:userVoucherId. - Favorites — On Explore or the detail header, use the heart to save or remove a favorite (sign in may be required).
Figures — Explore listing (/explore). Voucher claim — claim/detail at /vouchers/:id (Share, favorite, Claim).
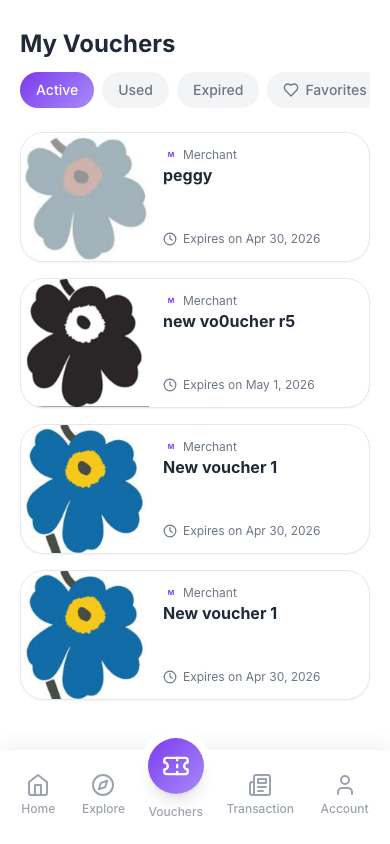
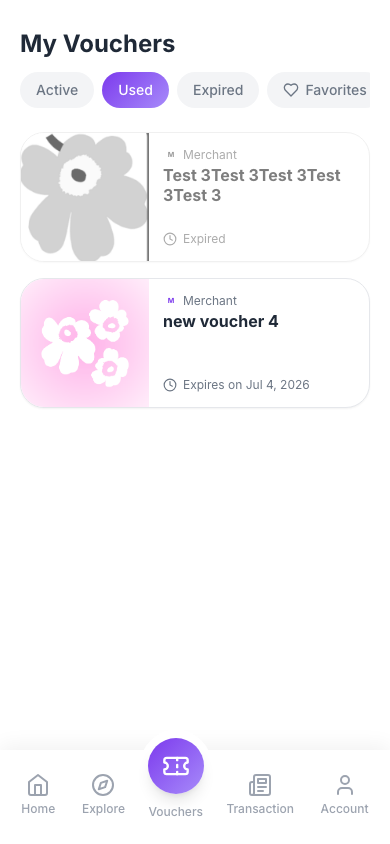
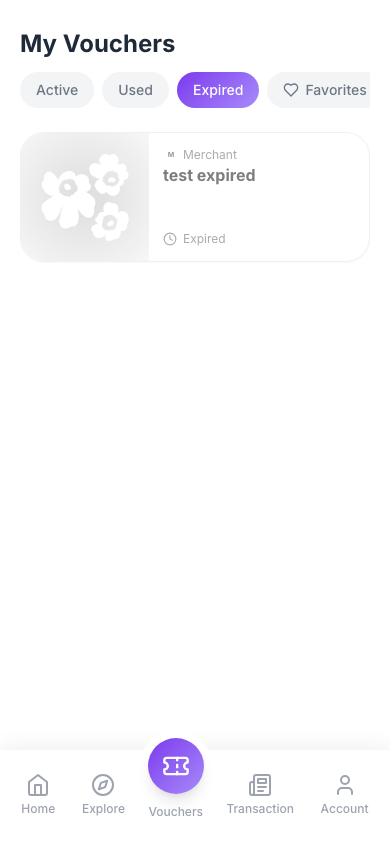
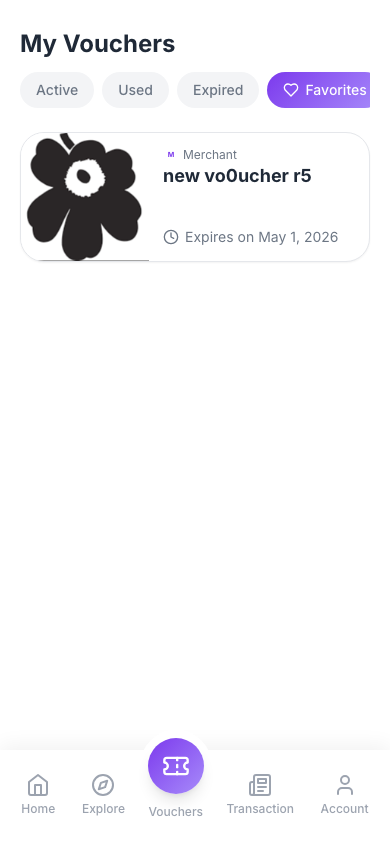
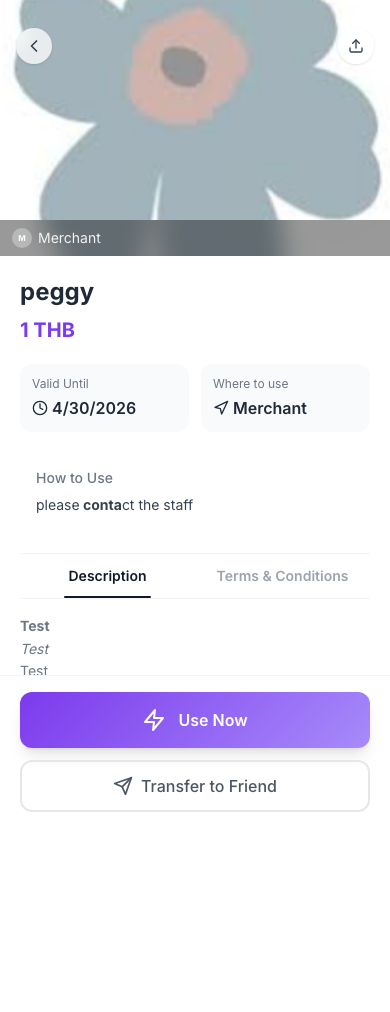
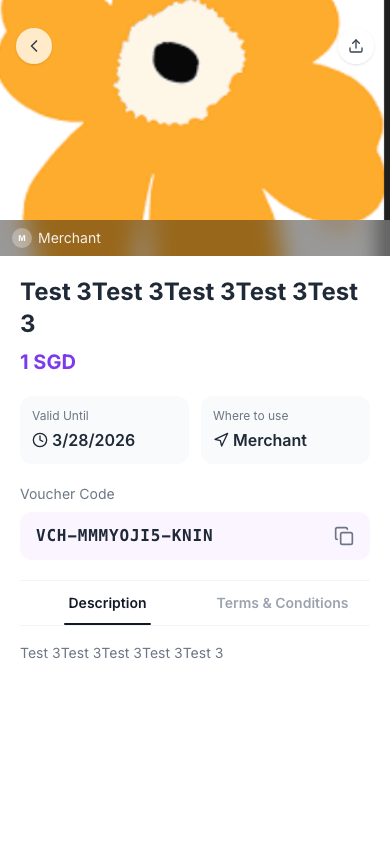
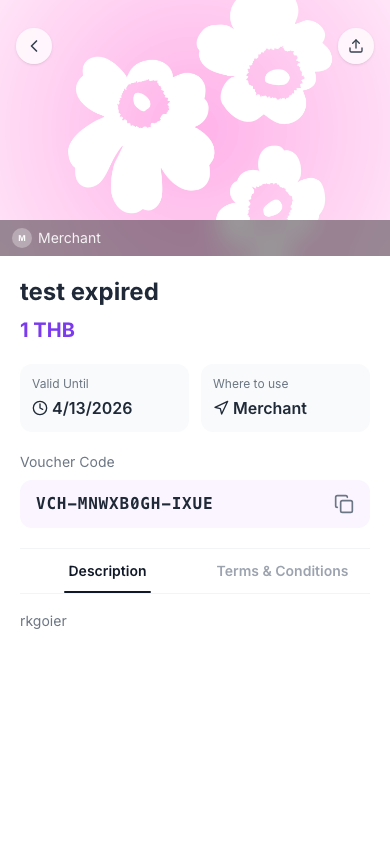
7. Vouchers
Your claimed vouchers at /vouchers (guests see a sign-in prompt). Four tabs: Active, Used (redeemed), Expired, and Favorites (heart-saved from Explore). Each row shows merchant, title, and a clock expiry line. Optional deep link: ?tab=active|redeemed|expired|favorites.
How to use
- Tabs — Active: still valid and not yet redeemed. Used: already redeemed at the merchant. Expired: past validity. Favorites: voucher templates you saved; they are not your claimed copies until you claim them elsewhere.
- How cards look (My vouchers) — While a voucher is usable, the card is full color. If it is past expiry (including in Expired or still listed under Active/Used with an elapsed date), the card is dimmed with grayscale and reduced opacity. Favorites rows are always full color; only the expiry line reflects urgency or “expired”.
- Expiry line (clock) — More than 24 hours before end → Expires on plus a locale-aware short date (day, short month, year). Within 24 hours but not yet ended → whole line in red with the clock icon: 1–24 h left shows hours remaining; under 1 hour shows a live minutes:seconds countdown (updates every second). After the end time → label Expired (muted gray, not red).
- Tap a claimed row (Active / Used / Expired) to open your voucher at
/voucher/:id. In Favorites, tap to open the public voucher / claim screen at/vouchers/:id(same as from Explore).
Consumption types on your voucher (claimed copy)
- Claim vs use — Tapping Claim on Explore only adds the voucher to your wallet (token spend). It does not by itself move the row to Used. Used means the voucher instance was consumed in VIO (e.g. staff scan, Get Code flow below, or API redeem) — i.e.
redeem/ consumption was recorded. - VIO Code — After claim, the app may show a VIO redemption code or QR (for staff to scan your
/redeem/...link). That is not the supplier’s secret code; it is your instance identifier for in-store redemption. The voucher stays on Active until consumption is recorded. - QR Code (CSV supplier pool) — The QR encodes the supplier’s code from the CSV pool. You only see that code/QR after you tap Get Code (which assigns the next free code and records consumption). Until then, no supplier QR is shown (the app does not show the VIO redemption code in that block — it is not a substitute for the supplier code).
- Coupon Code (CSV supplier pool) — Same as QR Code for assignment: tap Get Code to reveal barcode + copyable supplier code. Until then, none is shown.
- URL / Manual / External (VouChain) — Follow the on-screen instructions; external vouchers may show extra steps (e.g. generate code) per provider.
Figures — List (default capture = first load, same as Active tab). Tabs — Active, Used, Expired, Favorites (vouchers-tab-*.png). Detail — owned voucher vs Favorites public voucher (voucher-detail-*.png).

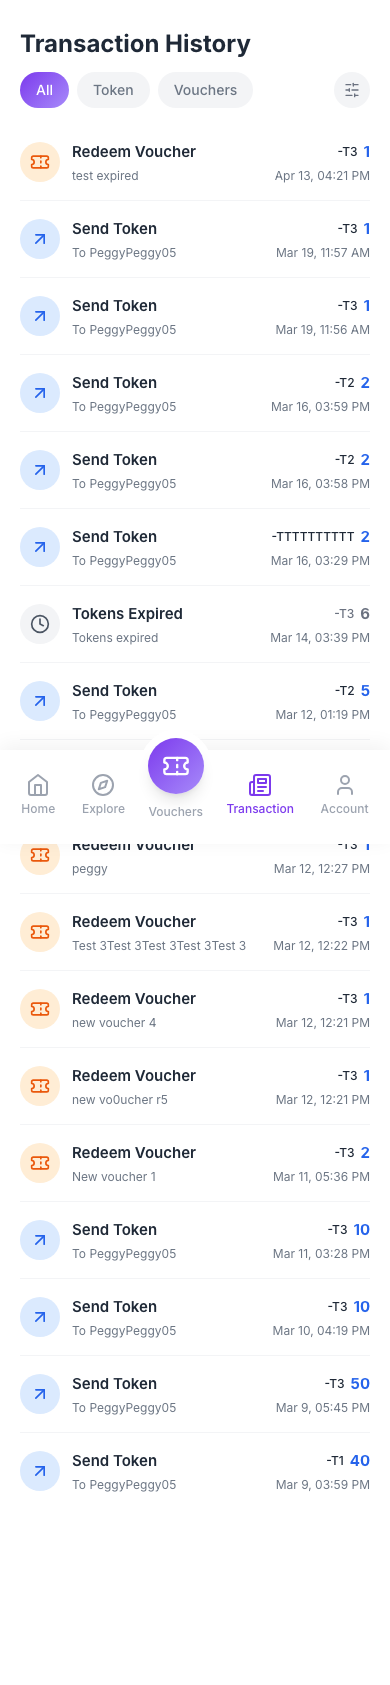
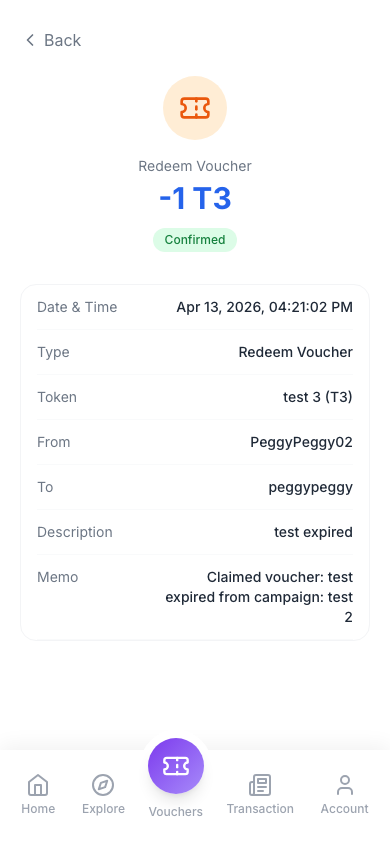
8. Transaction History
Unified ledger at /history: tabs All, Token, and Voucher; filters (date range, direction: all / sent / received); Load more; tap any row to open transaction detail at /transaction (passes the entry in navigation state — not a deep link by URL alone).
How to use
- Tabs — Switch All, Token, or Voucher to focus the list.
- Filters — Open the filter panel; set date range and direction (all / sent / received), then apply or clear.
- Pagination — Use Load more when more rows exist.
- Detail — Tap a row to open transaction detail (
/transaction): type, amounts, parties, memo, status, timestamps, copy actions as available.
Figures — History list (/history). Detail — transaction breakdown (transaction-detail.png).
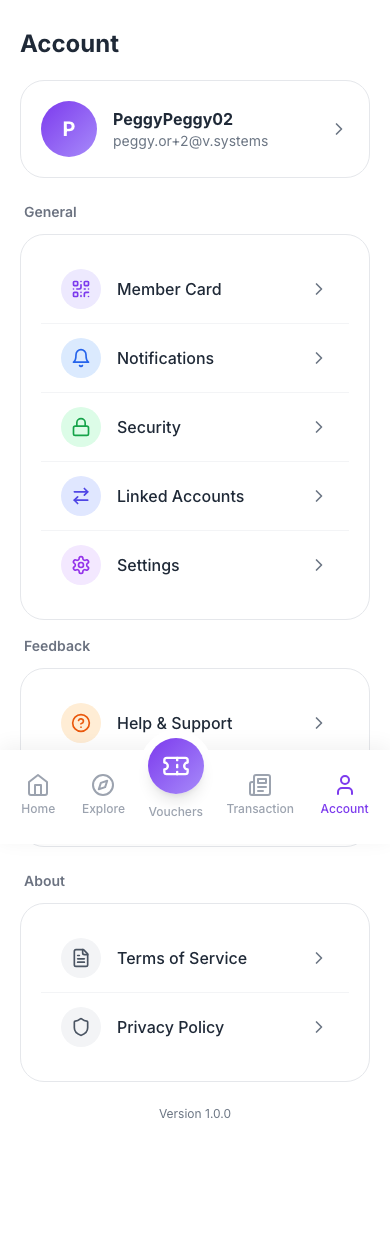
9. Account
Hub for profile, Member Card (wallet QR modal), notifications, Security, Linked accounts, Settings, Help & support, Logout, and Terms / Privacy links. The items Member Card through Help & Support each have a dedicated section (with screenshot) later in this guide; Logout (section 17), Terms of Service (section 18), and Privacy Policy (section 19) each have their own section at the end of this guide.
How to use
- Open Account from the bottom navigation
- Tap the profile card to edit Profile (
/account/profile) — see Profile section - Under General: Member Card (QR modal), Notifications, Security, Linked accounts, Settings — each is documented in its own subsection below
- Under Feedback: Help & support — see Help & Support section
- Under About: Terms and Privacy open in-app routes (
/terms,/privacy) - Logout — In the Feedback card, bottom row Logout (red). Cancel closes the dialog; confirm ends the session and goes to home (
/) with history replace.
Figures — Account hub. Logout — confirmation dialog (account-logout-confirm.png); Cancel stays signed in.

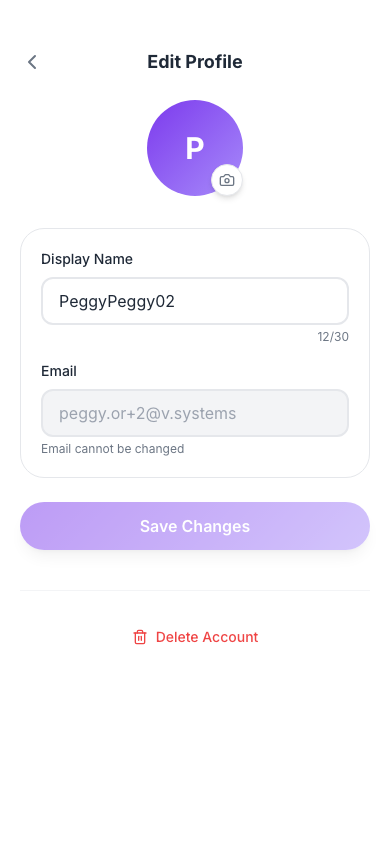
10. Profile
Edit display name (max 30 characters) and profile photo on /account/profile. Email and phone are shown read-only and cannot be edited in this screen (each field includes a short note that it cannot be changed).
How to use
- Display name — Editable text field with a character counter (max 30).
- Email / phone — Shown only when your account has them; fields are disabled (read-only). They cannot be edited on this screen — helper text under each field states they cannot be changed.
- Profile photo — Tap the camera control on the bottom-right of the avatar. Choose from gallery or take a photo (device camera where supported). If a photo is already set, Remove photo clears your pending choice until you save. Files must be 2 MB or smaller (otherwise an error toast appears). The new photo is applied when you tap Save changes together with your name.
- Save changes — Full-width button below the form; disabled until display name or avatar changes. Shows a loading state while saving.
- Delete account — Below a separator at the bottom, tap Delete Account (red, trash icon). A dialog shows the title, warning (permanent loss of data, vouchers, tokens), Cancel, and Delete to confirm. Confirming deletes the account, logs you out, and navigates to login.
Figures — Profile editor (/account/profile): avatar, display name, read-only email/phone, Save changes, Delete account.
11. Member Card
Opened from Account → Member Card (not a separate URL): a modal with gradient header, your name, email or phone, and a QR code encoding your wallet address so others can send you tokens. If there is no wallet address yet, the QR area shows a short empty state.
How to use
- On Account, under General, tap Member Card
- Review the modal: close with X top-right or tap the dimmed backdrop
- The QR scans to your wallet address; a monospace line may repeat the address below the code
Figures — Member Card modal (QR and wallet address) opened from Account.

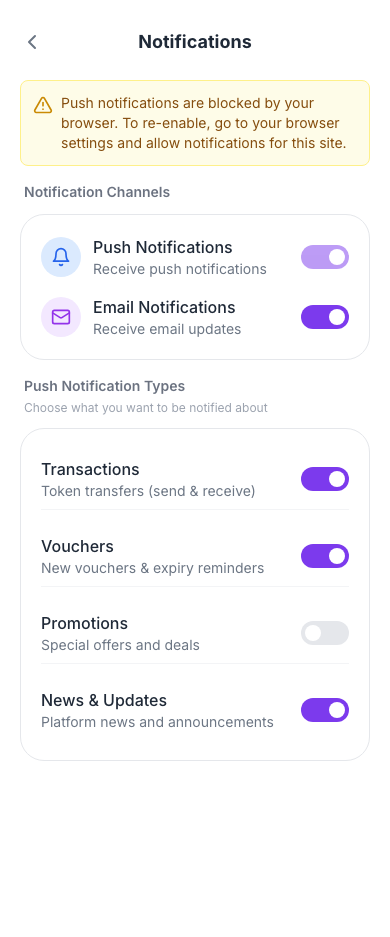
12. Notifications
Notification preferences at /account/notifications: push (when the browser supports Web Push), email, and category toggles (Transactions, Vouchers, Promotions, News). A banner can warn if push is blocked or unsupported.
How to use
- Toggle push on or off — may request browser notification permission; if denied, the app may revert the toggle and show a message
- Toggle email notifications
- Enable or disable each category row (transactions, vouchers, promotions, news)
- Changes are saved via the API when you toggle (watch for loading or toast feedback)
Figures — Notifications preferences (/account/notifications).
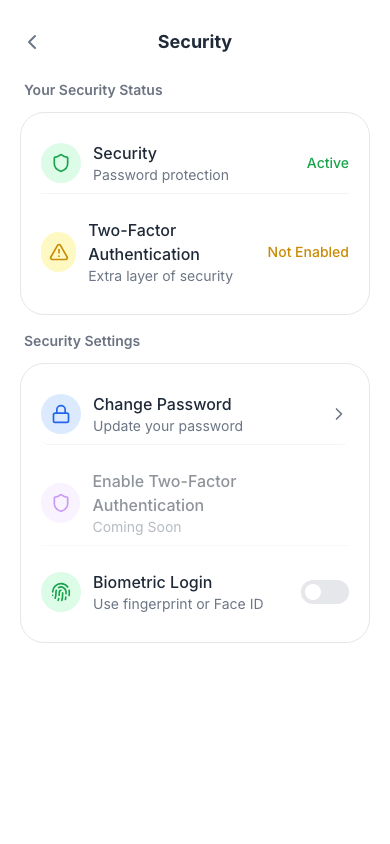
13. Security
Security at /account/security: Change password (navigates to /account/security/change-password), 2FA status (may show as coming soon), and Biometric login (WebAuthn) on supported browsers/devices.
How to use
- Review the summary card for password / 2FA status
- Tap Change password to open the dedicated flow
- Enable 2FA may be disabled until the feature ships
- Toggle Biometric login where available to register or clear device credentials
Figures — Security (/account/security): password, 2FA, biometrics.
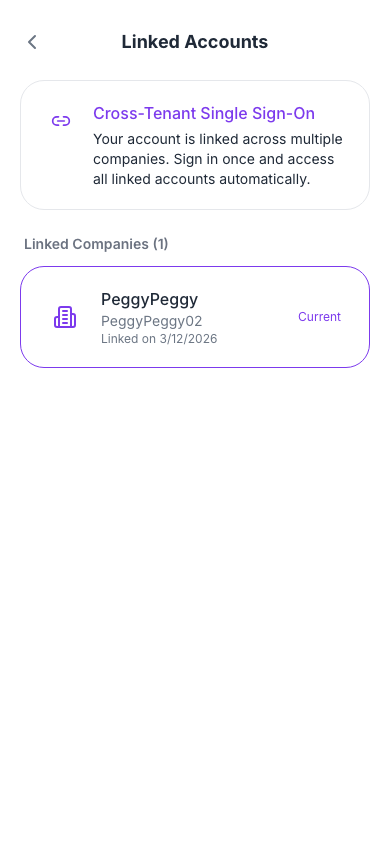
14. Linked Accounts
Lists linked portals for your global identity (/account/linked-accounts). If you have no linked identity, you see an empty state. Otherwise each card shows tenant (and sub-company), current badge, linked date, and switch to open another tenant in a full page navigation.
How to use
- Read the info card at the top
- If no global identity, you see a no linked accounts message
- When links exist, use Switch (arrows) on another portal to go to
/{tenantSlug}/or/{tenantSlug}/{subCompanySlug}/ - The current portal is highlighted with a badge
Figures — Linked accounts (/account/linked-accounts): global identity and portal switching.
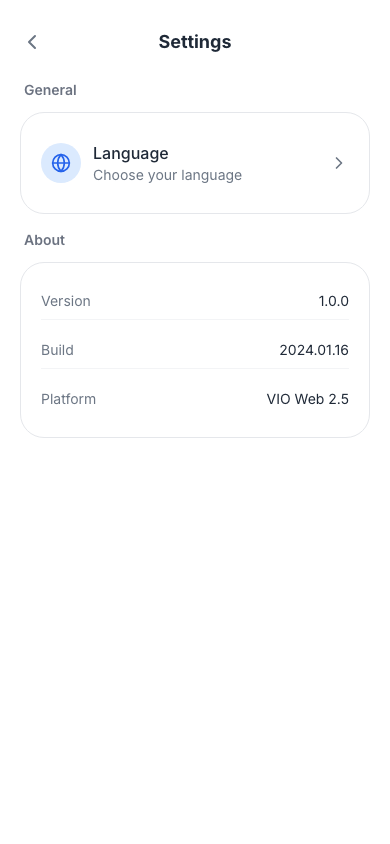
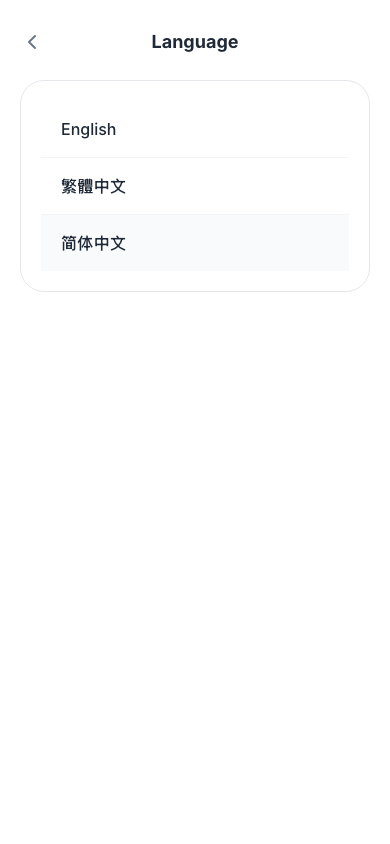
15. Settings
App settings at /account/settings: Language row opens /account/settings/language; About shows version, build, and platform (read-only).
How to use
- Tap Language to change UI locale
- Scroll About for version / build / platform
Figures — Settings main list (/account/settings). Language — locale screen (/account/settings/language, settings-language.png).
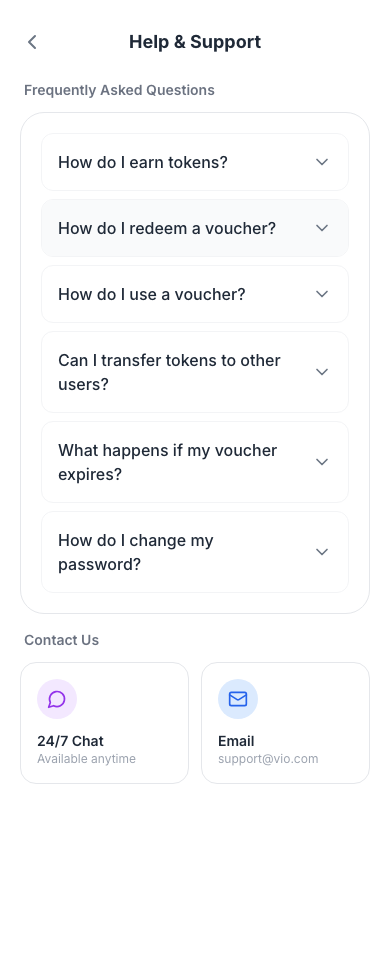
16. Help & Support
Help center at /account/help: browse topics, search, and access support or report issues (content depends on tenant configuration). Logout lives on Account in the same Feedback card as Help & support (see the Logout confirmation screenshot in this section).
How to use
- Use back to return to Account
- Browse or search help content as implemented for your tenant
- Follow links for contact or issue reporting when shown
Figures — Help & Support (/account/help). Logout — same confirmation dialog as on Account (account-logout-confirm.png); steps in Logout.
17. Logout
From Account → Feedback, tap Logout (red) and confirm or cancel. Confirming ends your session and returns you to home (/); Cancel closes the dialog without signing out.
How to use
- On Account, under Feedback, tap Logout (red)
- Confirm to end your session and return to home (
/), or Cancel to stay signed in
Figures — Logout confirmation (account-logout-confirm.png).
18. Terms of Service
Terms of Service at /terms: scrollable legal content with a header back control (also linked under Account → About and on login/register).
How to use
- Open from Account → About → Terms, or from Terms / Privacy links on the login and register screens
- Scroll to read; use back to return
Figures — Terms of Service (/terms), scrollable legal content.

19. Privacy Policy
Privacy Policy at /privacy: scrollable policy content with a header back control (also linked under Account → About and on login/register).
How to use
- Open from Account → About → Privacy, or from Terms / Privacy links on the login and register screens
- Scroll to read; use back to return
Figures — Privacy Policy (/privacy), scrollable policy content.

20. Membership
The Membership page (/membership) is available when your tenant has the membership-tiers feature enabled. It displays your personalised member card — showing your current tier name, colour theme, accrued growth points, and growth multiplier — together with a progress bar indicating how many points are needed to reach the next tier.
Three tabs below the card provide further detail:
- Perks — lists the benefits and privileges of your current tier
- Growth History — a paginated log of every growth-point event (activity type, points earned, date)
- All Tiers — a summary of every tier in the programme so you can see what thresholds and benefits each one offers
If you have recently changed tier, a tier-change notification popup appears automatically the next time you open this page; tap the close button to dismiss it.
How to use
- Tap Membership in the bottom navigation or go to Account → Membership
- View your current tier on the gradient member card — name, growth points, and multiplier are shown
- Check the progress bar beneath the card to see how close you are to the next tier
- Tap the Perks tab to read your current tier benefits
- Tap the Growth History tab to browse a chronological list of how you earned growth points
- Tap All Tiers to compare tiers and plan your path to higher membership levels
- If a tier-change popup appears (upgrade or downgrade), read the message and tap Close to dismiss it
Need Help?
If you encounter any issues or have questions, please visit the Help & Support section in the app or contact your administrator.
Guide generated by npm run generate:member on 2026-04-13. Set MEMBER_CAPTURE_FORGOT_PASSWORD_OTP in scripts/config.js to also capture forgot-password-2-otp.png (sends a real reset code). Set MEMBER_VOUCHER_CAPTURE_IDS if a vouchers tab is empty but you still need detail screenshots.